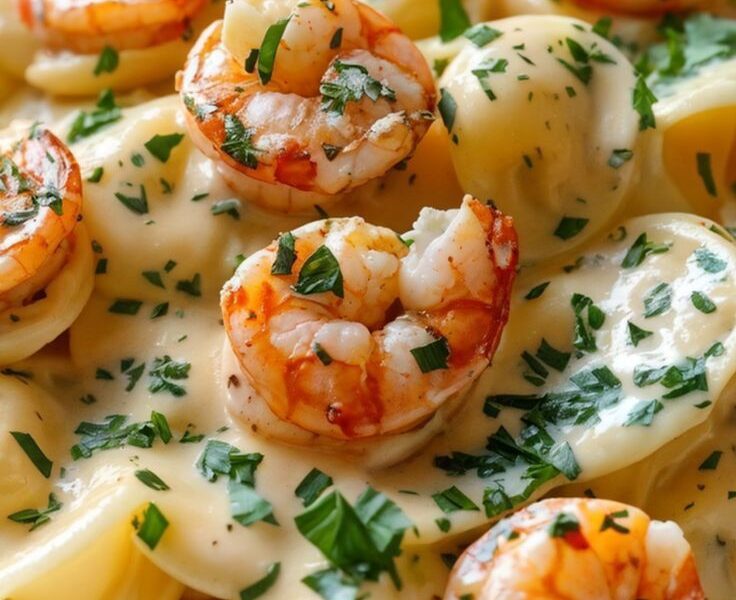
Creamy Garlic Shrimp Stuffed Tortellini
If you love creamy pasta dinners with plenty of garlic, tender shrimp, and cheesy tortellini, this Creamy Garlic Shrimp Stuffed Tortellini is a must-try. Cheese-filled tortellini is tossed with juicy garlic-seasoned shrimp in a silky Parmesan cream sauce for a restaurant-style dinner you can make right at home.
It’s rich, comforting, and incredibly flavorful without requiring complicated ingredients. Serve it with warm garlic bread and a crisp green salad for an easy weeknight dinner or a cozy weekend meal.
🛒 Ingredients
For the Shrimp
- 1 lb large shrimp, peeled and deveined
- 1 tablespoon olive oil
- 2 tablespoons butter
- 4 cloves garlic, minced
- ½ teaspoon Italian seasoning
- ¼ teaspoon paprika
- ¼ teaspoon salt
- ¼ teaspoon black pepper
- 1 tablespoon fresh lemon juice
For the Tortellini
- 20 oz refrigerated cheese-filled tortellini
- 1 teaspoon salt for the pasta water
For the Creamy Garlic Sauce
- 2 tablespoons butter
- 4 cloves garlic, minced
- 1 cup heavy cream
- ½ cup chicken broth
- 1 cup freshly grated Parmesan cheese
- ½ teaspoon Italian seasoning
- ¼ teaspoon crushed red pepper flakes, optional
- ¼ teaspoon black pepper
- ½ cup reserved pasta water, as needed
- 2 tablespoons chopped fresh parsley
👩🍳 Instructions
1. Cook the Tortellini
Bring a large pot of salted water to a boil. Add the cheese tortellini and cook according to the package directions until tender.
Before draining, reserve about ½ cup of the pasta water.
Drain the tortellini and set aside.
2. Season the Shrimp
Pat the shrimp dry with paper towels. Season them with Italian seasoning, paprika, salt, and black pepper.
This helps the shrimp develop a flavorful crust while keeping the seasoning simple enough to complement the creamy sauce.
3. Cook the Garlic Shrimp
Heat the olive oil and 2 tablespoons of butter in a large skillet over medium-high heat.
Add the shrimp and cook for about 2 minutes per side, or until pink and opaque.
Add the minced garlic and cook for another 30–45 seconds, stirring constantly so the garlic doesn’t burn.
Drizzle the lemon juice over the shrimp, toss to coat, then transfer the shrimp to a plate.
4. Make the Creamy Garlic Sauce
Using the same skillet, reduce the heat to medium and add 2 tablespoons of butter.
Add the minced garlic and cook for about 30 seconds until fragrant.
Pour in the heavy cream and chicken broth. Stir well and bring the mixture to a gentle simmer.
Add Italian seasoning, black pepper, and red pepper flakes if using.
Let the sauce simmer for 2–3 minutes, stirring occasionally.
5. Add the Parmesan
Reduce the heat to low and gradually stir in the Parmesan cheese.
Continue stirring until the cheese melts completely and the sauce becomes smooth and creamy.
If the sauce becomes too thick, add a splash of reserved pasta water until you reach your desired consistency.
6. Combine Everything
Add the cooked tortellini to the creamy garlic sauce.
Gently toss until every piece of tortellini is coated.
Return the cooked shrimp to the skillet and carefully fold everything together.
Let it cook for another 1–2 minutes so the shrimp and tortellini can warm through and absorb some of the sauce.
7. Garnish and Serve
Sprinkle fresh chopped parsley over the top.
For an extra cheesy finish, add a little more freshly grated Parmesan.
Serve immediately while the sauce is warm and creamy.
💡 Tips for the Best Creamy Shrimp Tortellini
- Use fresh Parmesan: Freshly grated Parmesan melts much more smoothly than pre-shredded cheese.
- Don’t overcook the shrimp: Shrimp cook quickly. Remove them from the skillet as soon as they turn pink and opaque.
- Save some pasta water: The starchy water is perfect for loosening the sauce without making it watery.
- Keep the sauce at a gentle simmer: High heat can cause cream sauces to separate.
- Use refrigerated tortellini: It cooks quickly and works beautifully with the creamy garlic sauce.
- Add lemon at the end: A little acidity helps balance the richness of the cream and Parmesan.
🌶️ Easy Variations
Add Spinach
Stir in 2 cups of fresh baby spinach when the cream sauce is nearly finished. Cook until wilted.
Make It Spicier
Add extra crushed red pepper flakes or a pinch of cayenne pepper for a spicy garlic shrimp pasta.
Add Sun-Dried Tomatoes
Chopped sun-dried tomatoes add a sweet, tangy flavor that pairs especially well with shrimp and Parmesan.
Add Broccoli
Steam or blanch small broccoli florets and toss them into the finished pasta for a heartier dinner.
Extra Cheesy
Add ¼ cup of shredded mozzarella along with the Parmesan for an even richer sauce.
🥖 What to Serve With It
This creamy tortellini dinner pairs perfectly with:
- Garlic bread
- Parmesan breadsticks
- Caesar salad
- Simple green salad
- Roasted asparagus
- Steamed broccoli
- Sautéed green beans
A warm piece of crusty bread is especially good for soaking up the leftover garlic Parmesan sauce.
🧊 Storage and Reheating
Store leftovers in an airtight container in the refrigerator for up to 3 days.
To reheat, place the tortellini in a skillet over low to medium heat. Add a splash of milk, cream, or chicken broth and stir gently until heated through.
Avoid reheating over high heat because the creamy sauce can become too thick or separate.
Freezing is not recommended because the cream-based sauce may change texture after thawing.
📋 Recipe Details
Prep Time: 15 minutes
Cook Time: 20 minutes
Total Time: 35 minutes
Servings: 4–5
Category: Dinner
Cuisine: American-Italian
Method: Stovetop
❤️ Why You’ll Love This Recipe
This Creamy Garlic Shrimp Stuffed Tortellini brings together everything that makes a comforting pasta dinner irresistible: tender shrimp, cheesy tortellini, buttery garlic, and a creamy Parmesan sauce.
It comes together in about 35 minutes, making it easy enough for a busy weeknight but special enough for a family dinner or date-night meal. One skillet, simple ingredients, and plenty of creamy garlic flavor make this a recipe you’ll want to keep in your regular dinner rotation.